Upgrade to the latest version of Portworx Enterprise for continued support. Documentation for the latest version of Portworx Enterprise can be found here.
Install Portworx on OpenShift on vSphere with console plugin
Follow the instructions on this page to install Portworx on vSphere with console plugin.
Prerequisites
- Your cluster must be running OpenShift 4.12 or higher.
- You must have an OpenShift cluster deployed on infrastructure that meets the minimum requirements for Portworx.
- Ensure that any underlying nodes used for Portworx in OCP have Secure Boot disabled.
- You must have supported disk types.
Install the Portworx Operator
Before you can install Portworx on your OpenShift cluster, you must first install the Portworx Operator. Perform the following steps to prepare your OpenShift cluster by installing the Operator.
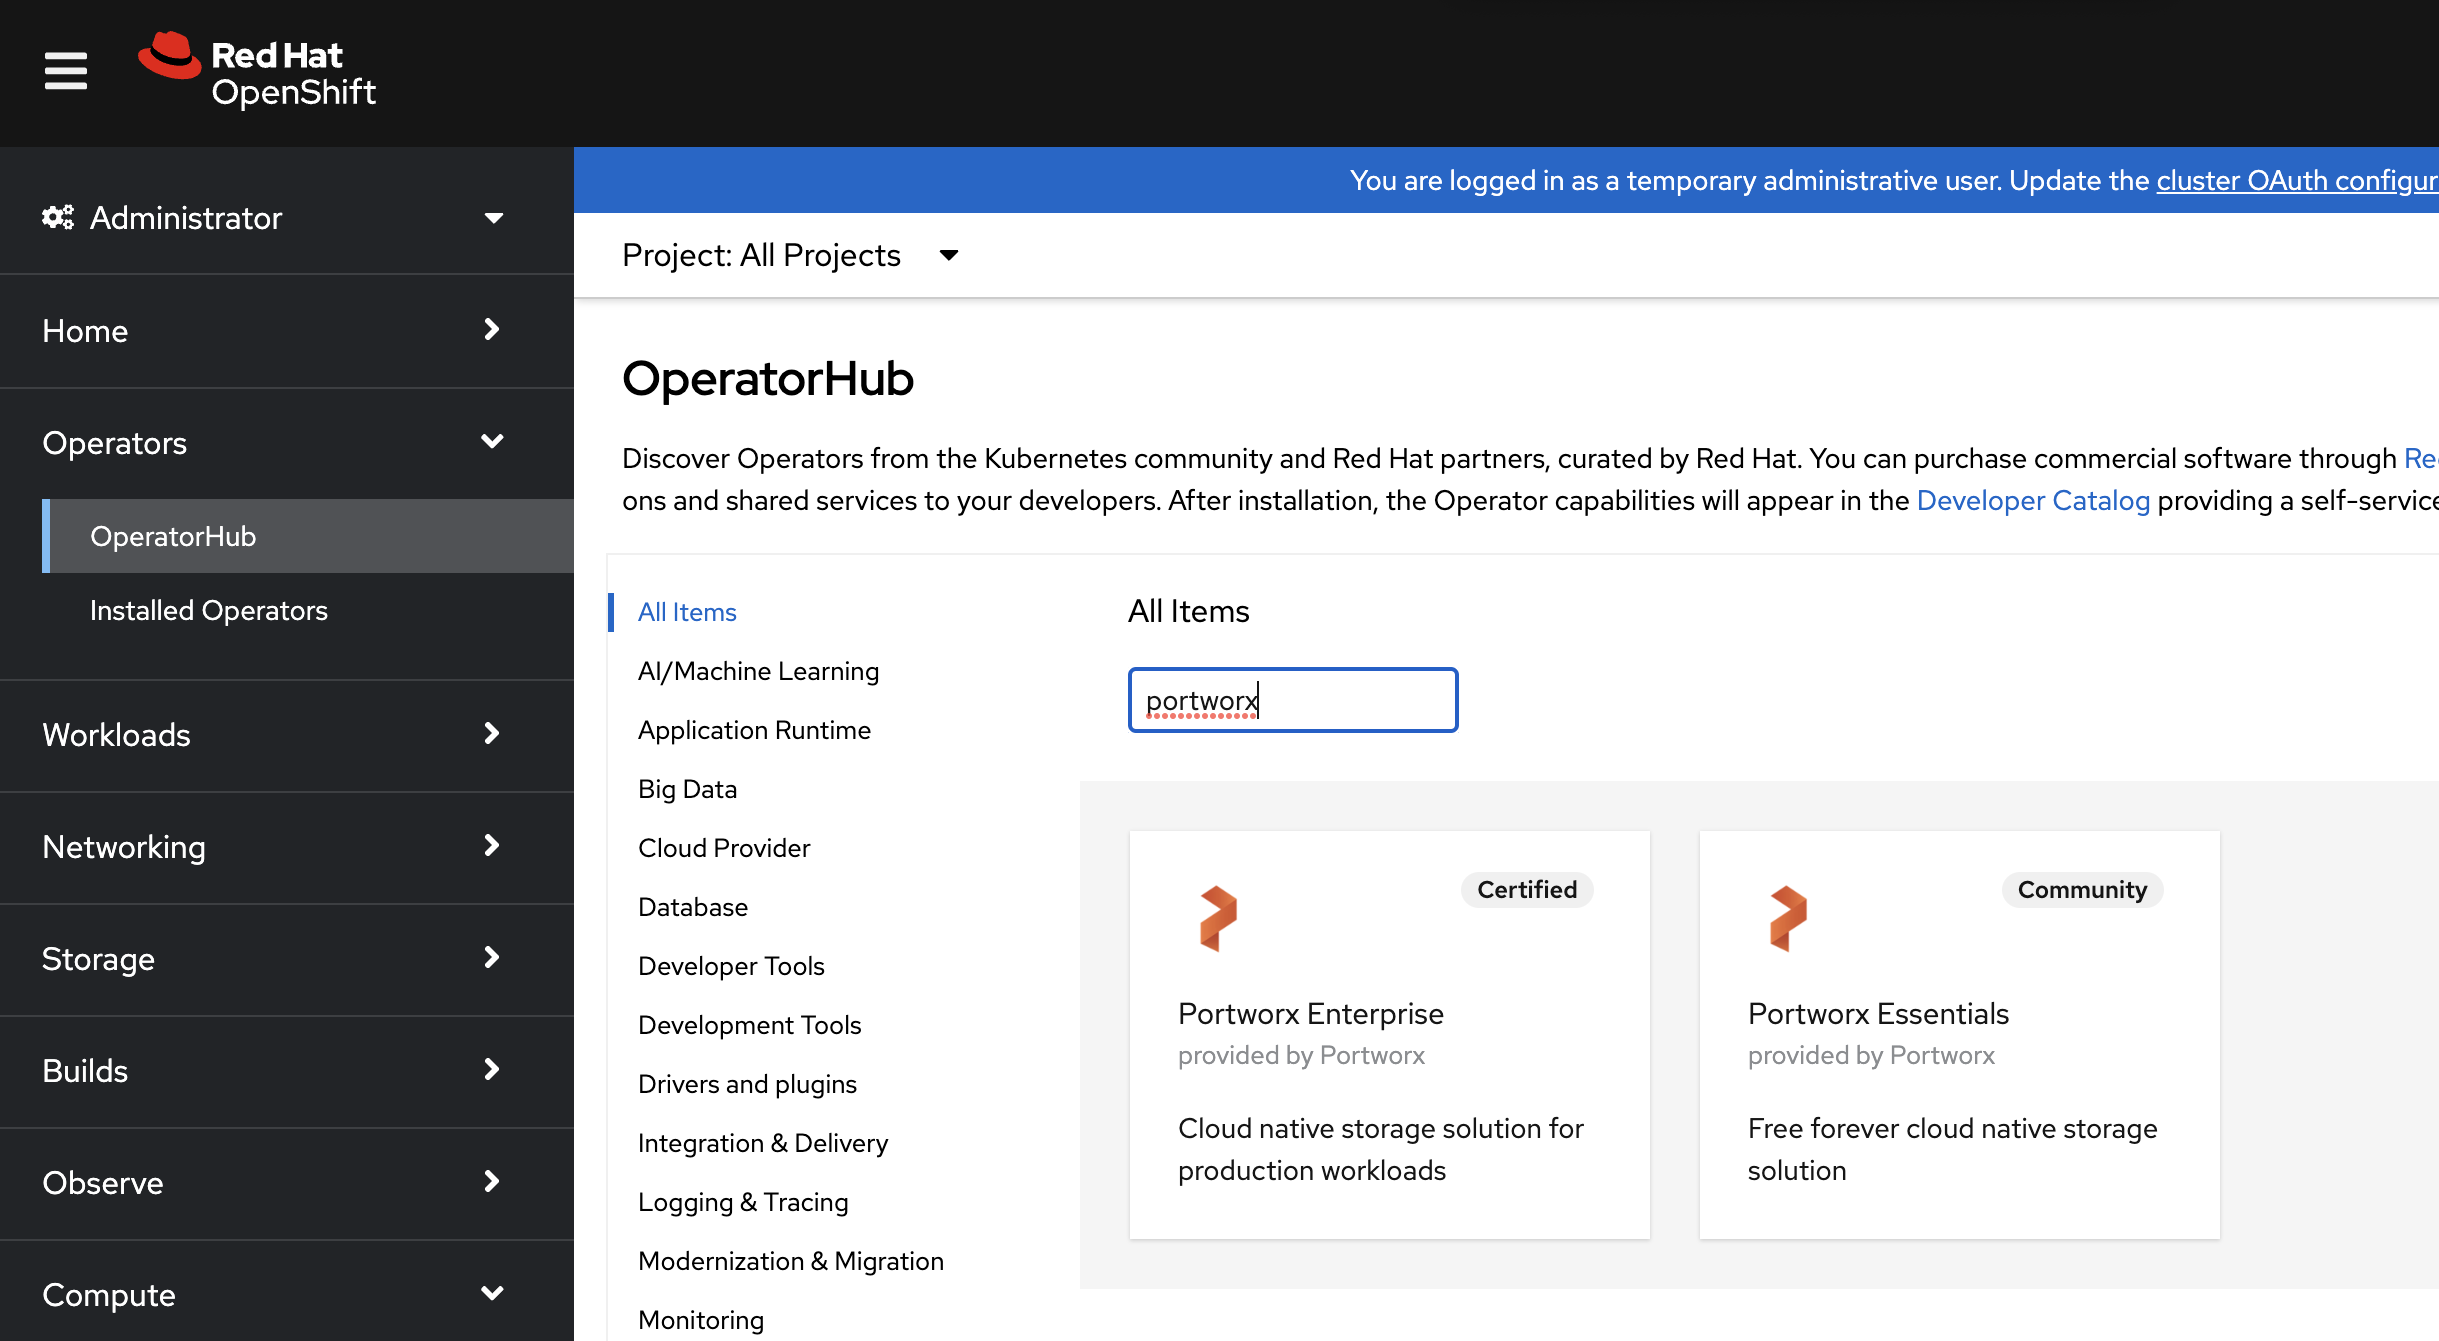
- From your OpenShift UI, select OperatorHub in the left pane.
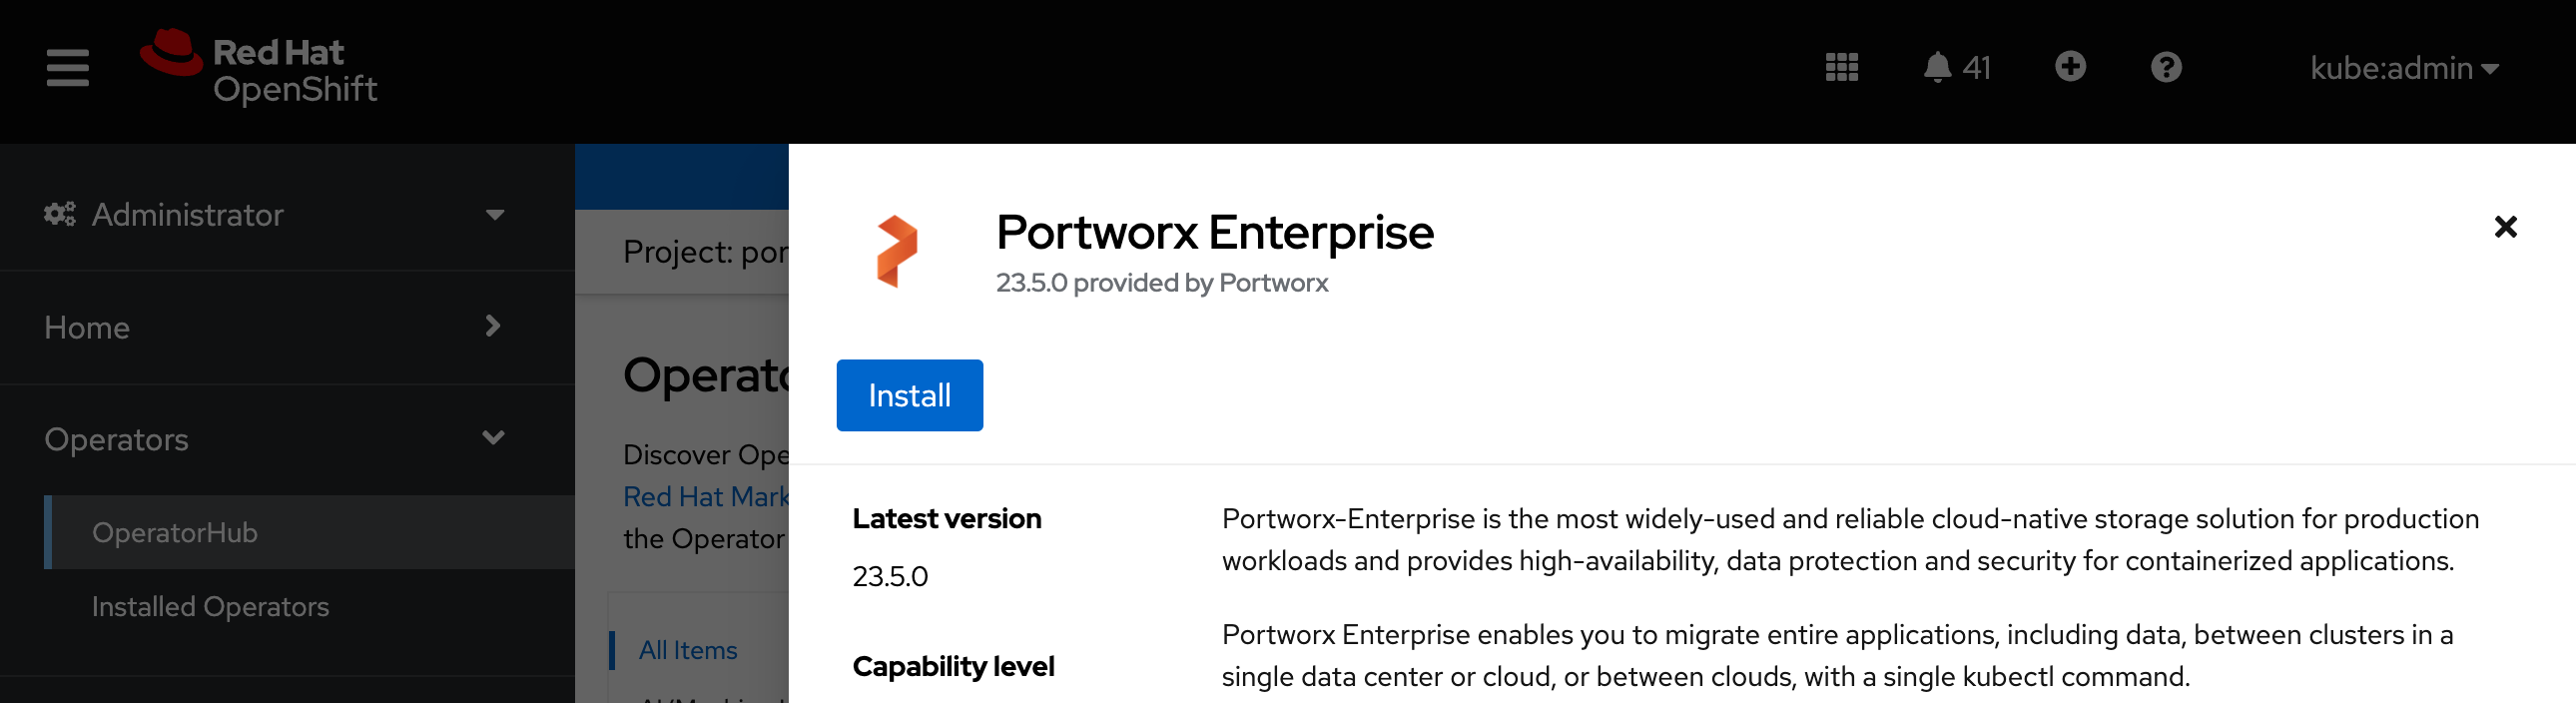
On the OperatorHub page, search for Portworx and select the Portworx Enterprise or Portworx Essentials card:
Click Install to install Portworx Operator:
Portworx Operator begins to install and takes you to the Install Operator page. On this page.
- Select the A specific namespace on the cluster option for Installation mode.
- Choose the Create Project option from the Installed Namespace dropdown.
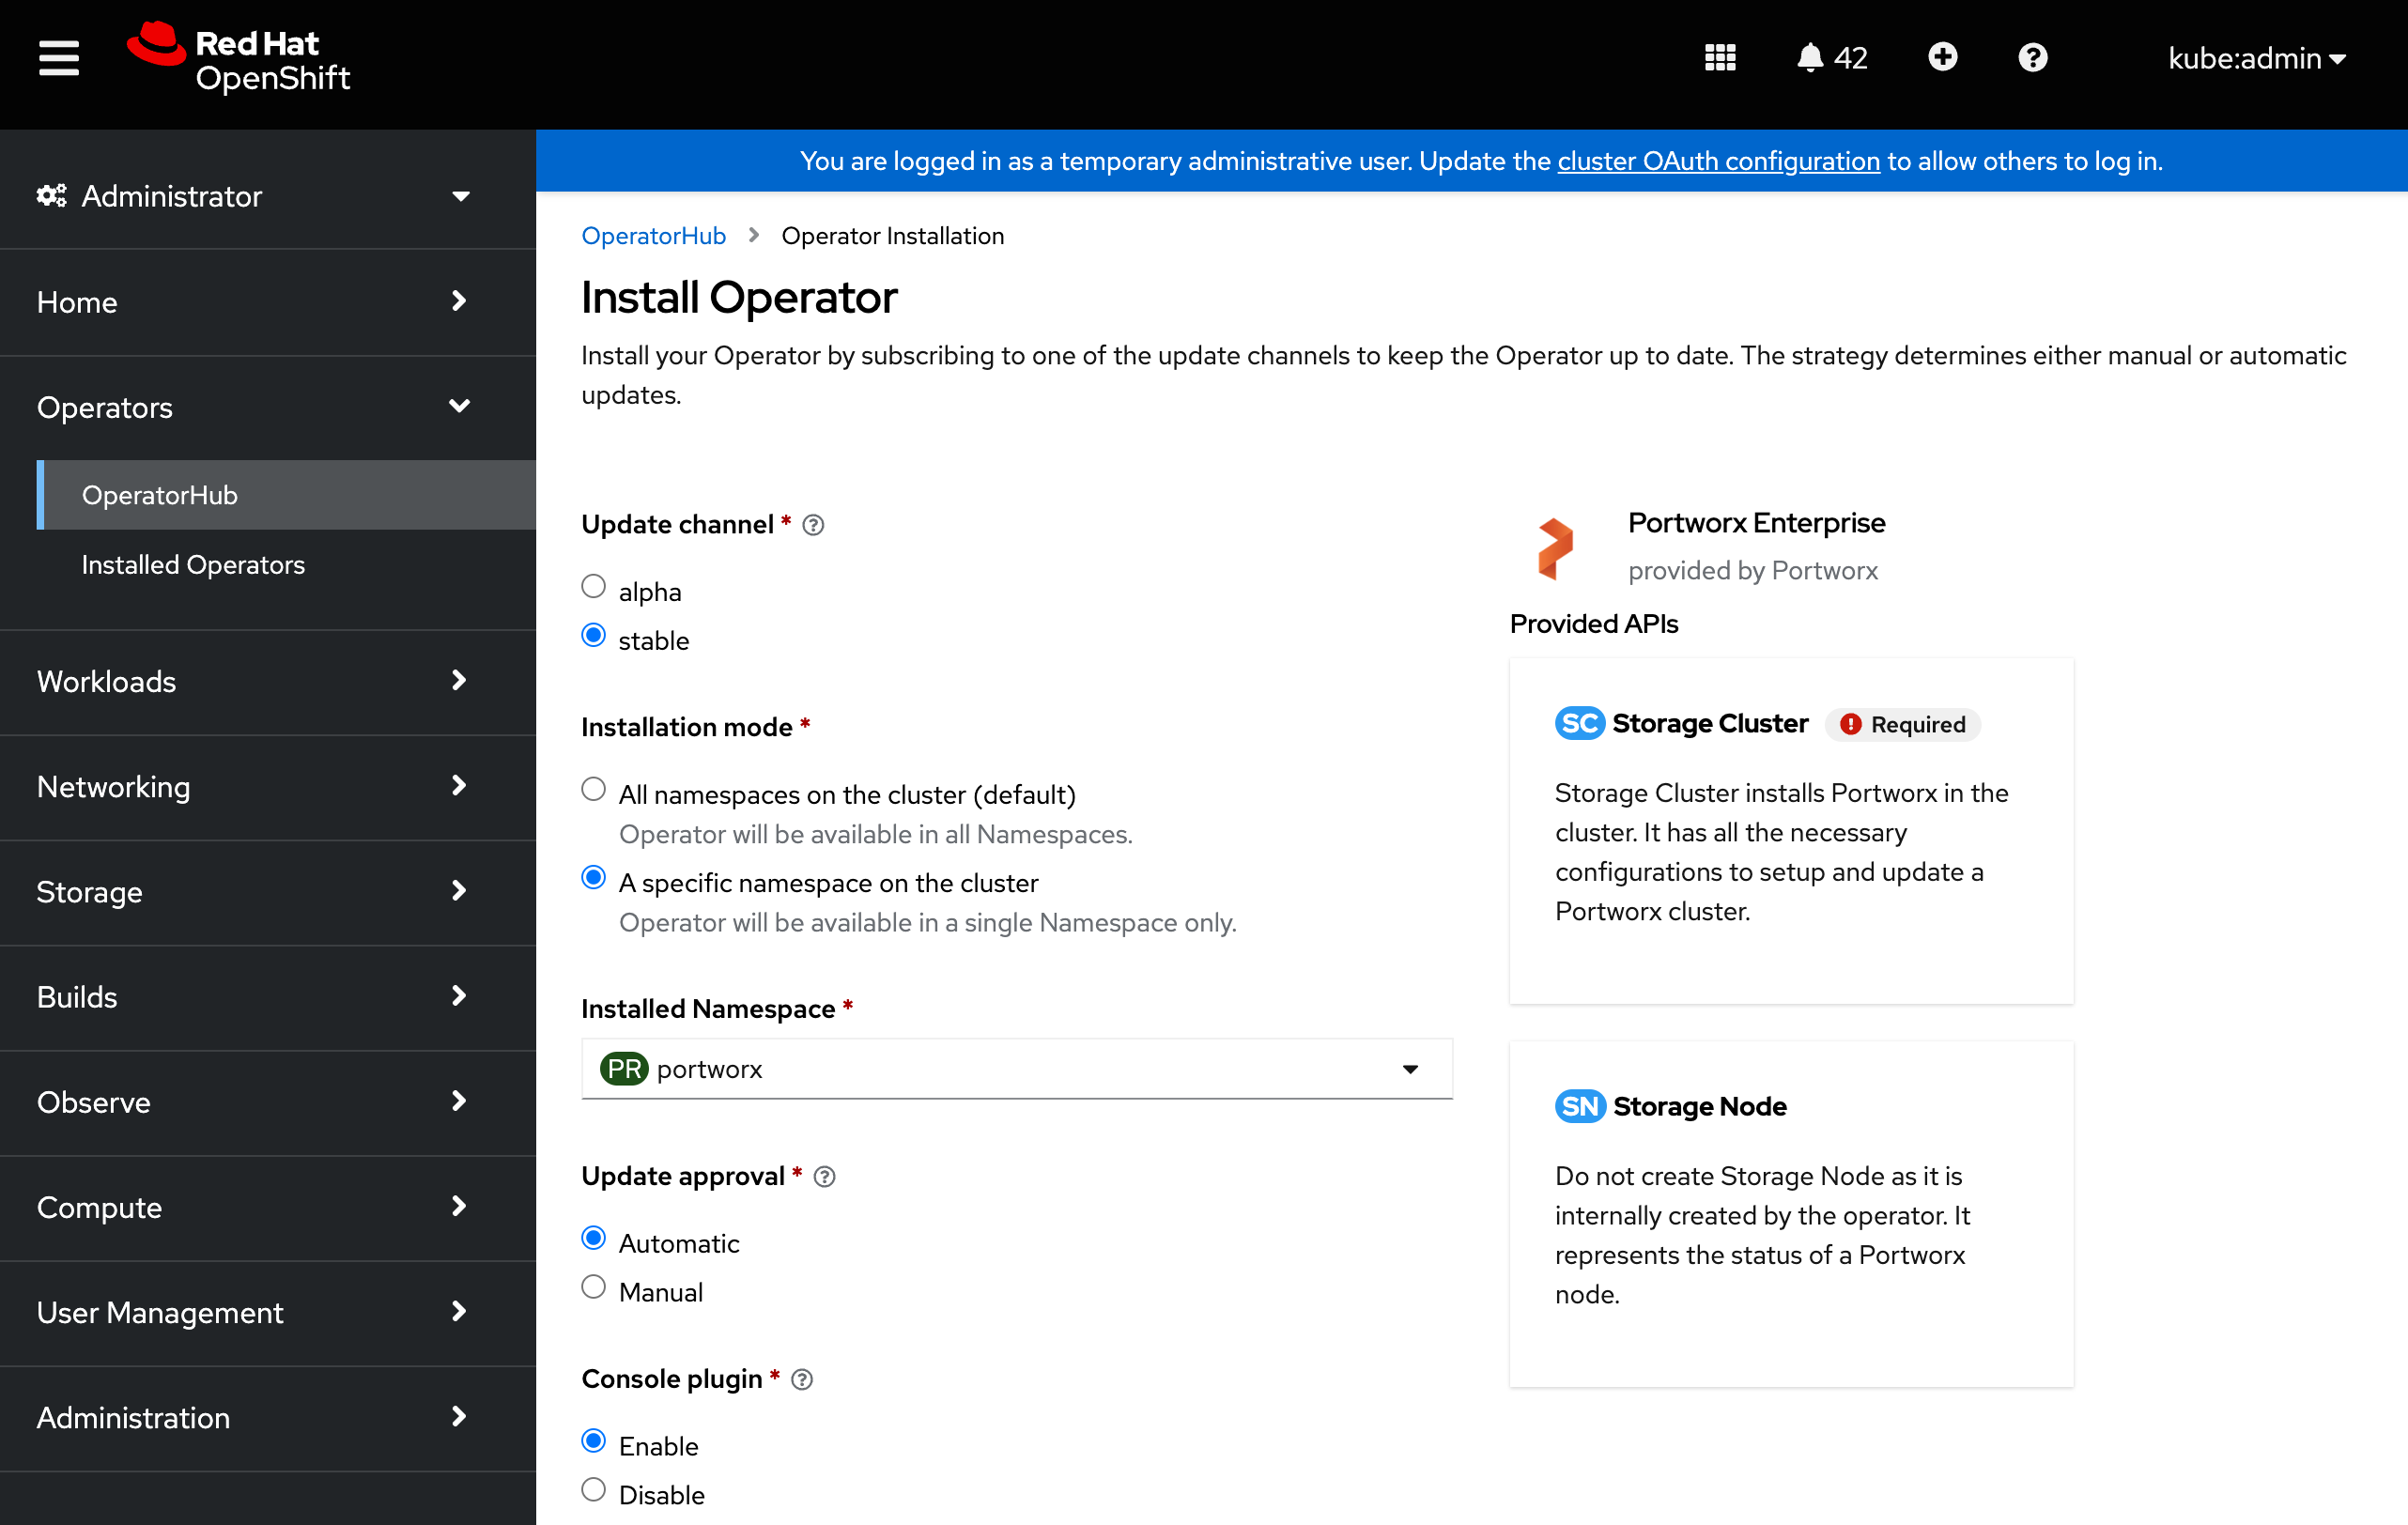
In the Create Project window, provide the name
portworxand click Create to create a namespace called portworx.To manage your Porworx cluster using the Portworx dashboard within the OpenShift UI, select Enable for the Console plugin option.
Click Install to deploy Portworx Operator in the
portworxnamespace.
Deploy Portworx
The Portworx Enterprise
Operator takes a custom Kubernetes resource called StorageCluster as input. The StorageCluster is a representation of your Portworx cluster configuration. Once the StorageCluster object is created, the Operator will deploy a Portworx cluster corresponding to the specification in the StorageCluster object. The Operator will watch for changes on the StorageCluster and update your cluster according to the latest specifications.
For more information about the StorageCluster object and how the Operator manages changes, refer to the StorageCluster article.
Disable storage DRS configuration
Portworx does not support the movement of VMDK files from the datastores on which they were created. Do not move them manually or have any settings that would result in a movement of these files. To prevent Storage DRS from moving VMDK files, configure the Storage DRS settings as follows using your vSphere console.
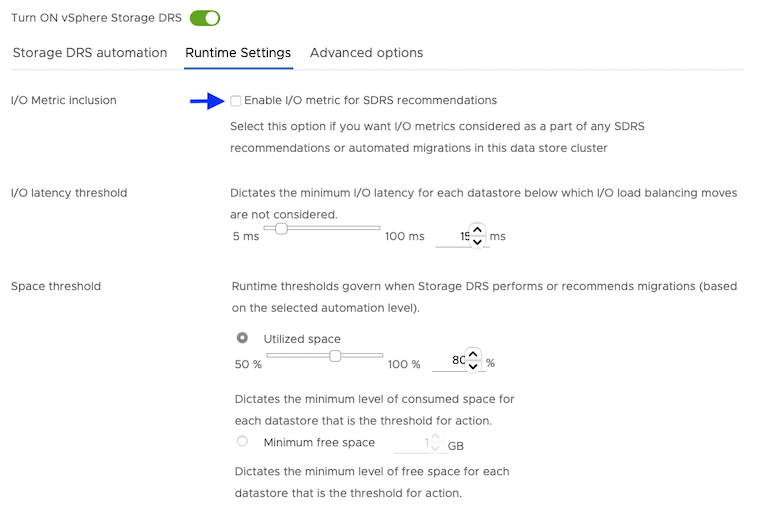
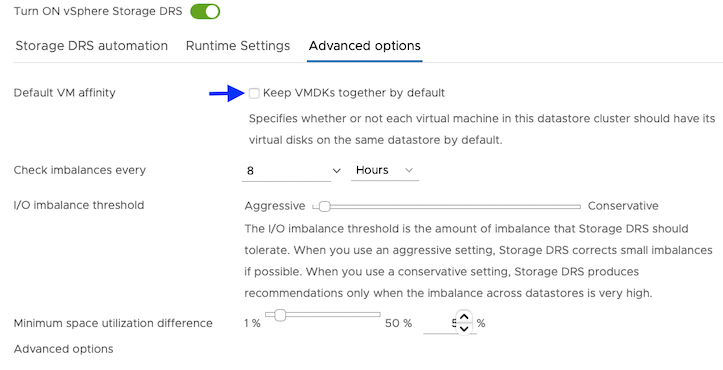
From the Edit Storage DRS Settings window of your selected datastore cluster, edit the following settings:
For Storage DRS automation, choose the No Automation (Manual Mode) option, and set the same for other settings, as shown in the following screencapture:
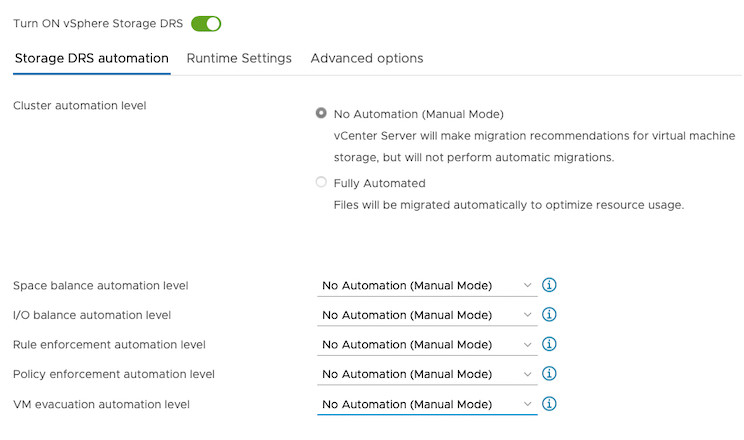
For Runtime Settings, clear the Enable I/O metric for SDRS recommendations option.
For Advanced options, clear the Keep VMDKs together by default options.
Grant the required cloud permissions
Grant permissions Portworx requires by creating a secret with user credentials:
-
Provide Portworx with a vCenter server user that has the following minimum vSphere privileges using your vSphere console:
- Datastore
- Allocate space
- Browse datastore
- Low level file operations
- Remove file
- Host
- Local operations
- Reconfigure virtual machine
- Virtual machine
- Change Configuration
- Add existing disk
- Add new disk
- Add or remove device
- Advanced configuration
- Change Settings
- Extend virtual disk
- Modify device settings
- Remove disk
If you create a custom role as above, make sure to select Propagate to children when assigning the user to the role.
- Datastore
Create a secret using the following template. Retrieve the credentials from your own environment and specify them under the
datasection:apiVersion: v1 kind: Secret metadata: name: px-vsphere-secret namespace: portworx type: Opaque data: VSPHERE_USER: <your-vcenter-server-user> VSPHERE_PASSWORD: <your-vcenter-server-password>VSPHERE_USER: to find your vSphere user, enter the following command:
echo '<vcenter-server-user>' | base64VSPHERE_PASSWORD: to find your vSphere password, enter the following command:
echo '<vcenter-server-password>' | base64
Once you’ve updated the template with your user and password, apply the spec:
oc apply -f <your-spec-name>Ensure ports 17001-17020 on worker nodes are reachable from the control plane node and other worker nodes.
If you’re running a Portworx Essentials cluster, then create the following secret with your Essential Entitlement ID:
oc -n portworx create secret generic px-essential \
    --from-literal=px-essen-user-id=YOUR_ESSENTIAL_ENTITLEMENT_ID \
    --from-literal=px-osb-endpoint='https://pxessentials.portworx.com/osb/billing/v1/register'
Generate the StorageCluster spec
To install Portworx with OpenShift, you must generate a StorageCluster spec that you will deploy in your cluster.
Navigate to PX-Central and log in, or create an account.
Select Portworx Enterprise from the Product Catalog page.
On the Product Line page, choose any option depending on which license you intend to use, then click Continue to start the spec generator.
Choose Portworx Version and select vSphere from the Platform dropdown.
Specify your hostname or the IP address of the vSphere server in the vCenter endpoint field.
Specify the datastore name(s) or datastore cluster name(s) available for Portworx in the vCenter datastore prefix field. To specify multiple datastore names or datastore cluster names, enter a generic prefix common to all the datastores or datastore clusters. For example, if you want Portworx to use three datastores named
px-datastore-01,px-datastore-02, andpx-datastore-03, specifypxorpx-datastore.Click Save Spec to generate the specs.
Apply the spec
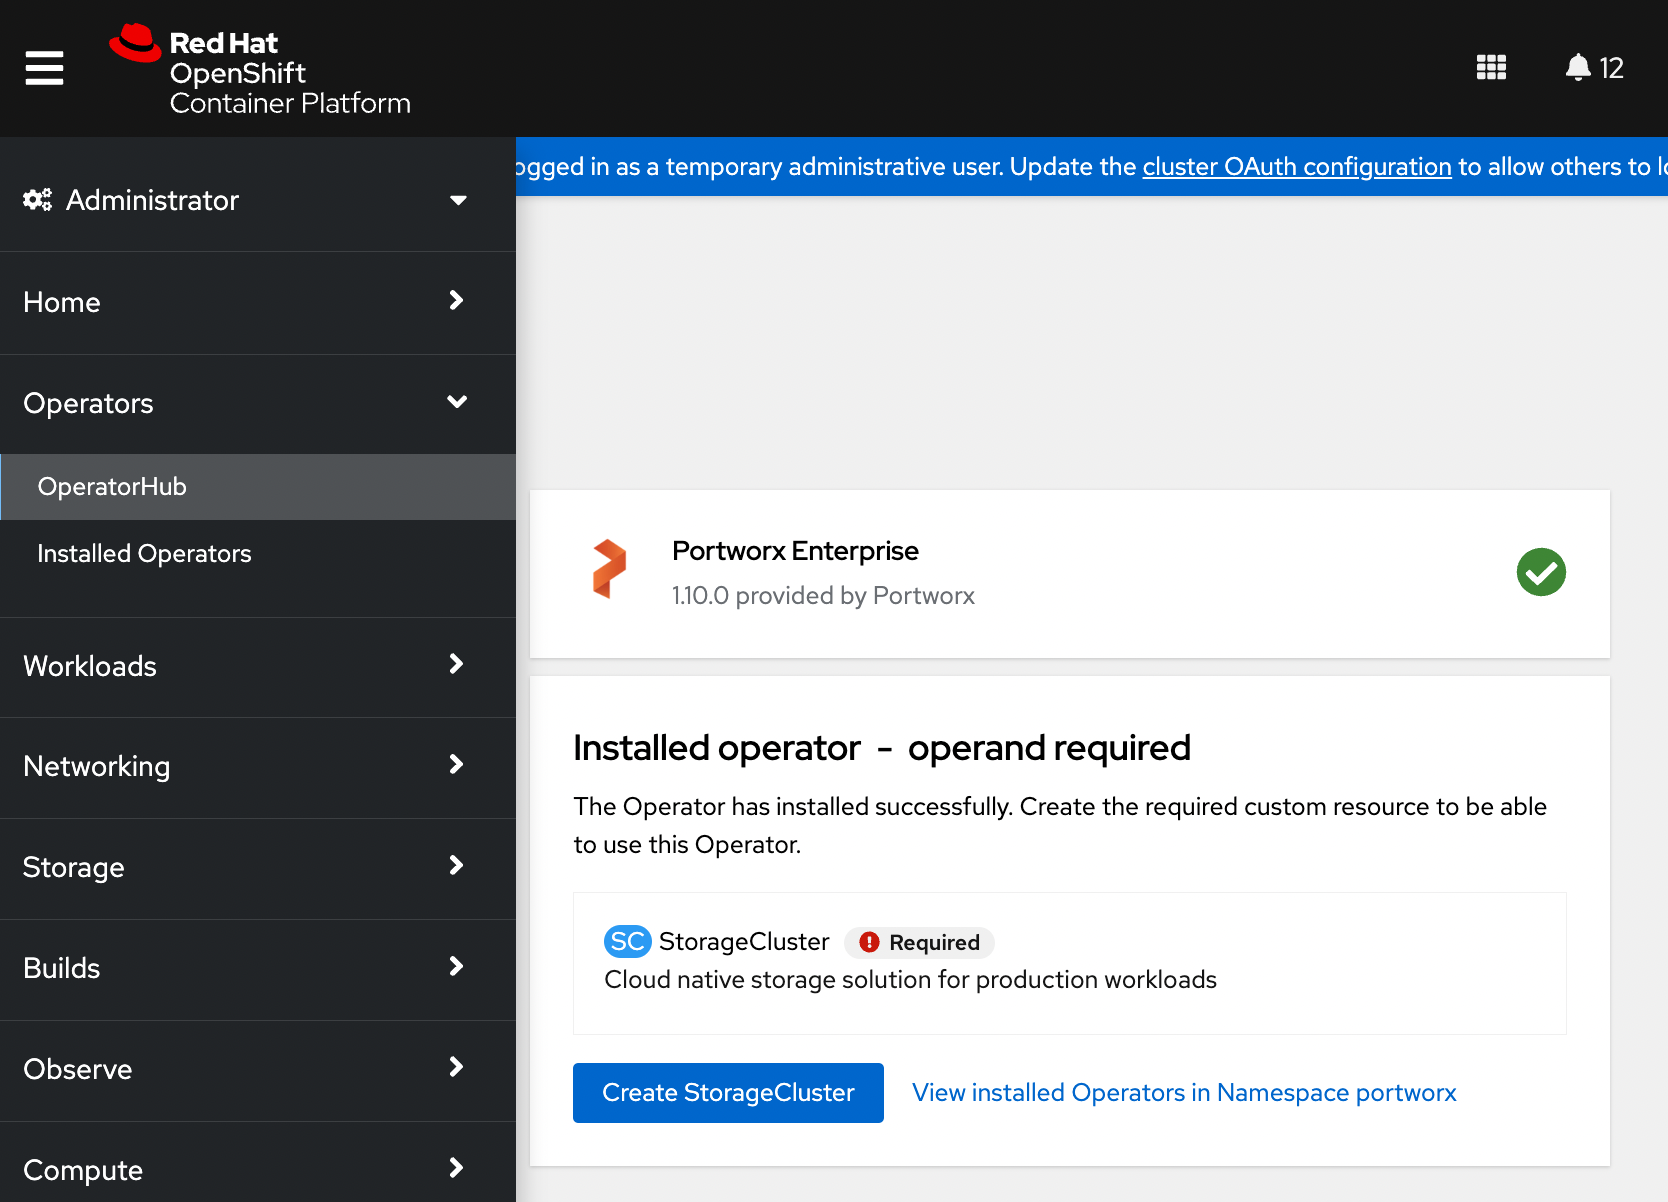
Once the Operator is installed successfully, create a StorageCluster object by clicking the Create StorageCluster button on the same page:
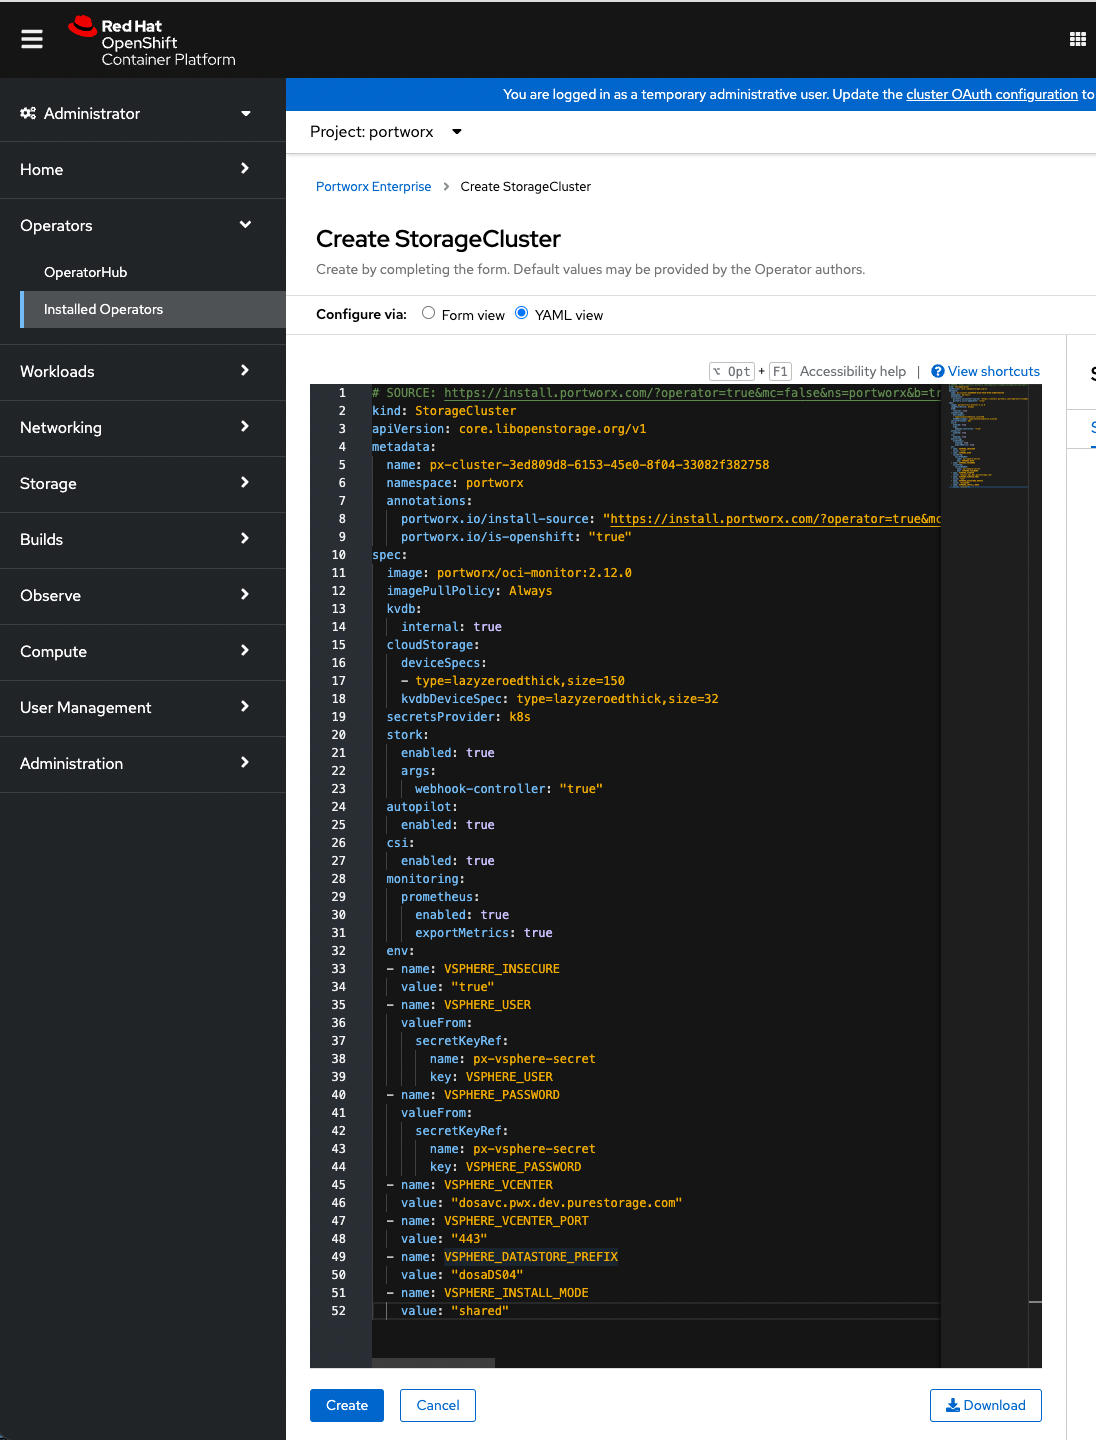
The spec displayed here represents a very basic default spec. Copy the spec you created with the spec generator and paste it over the default spec in the YAML view, and click Create:
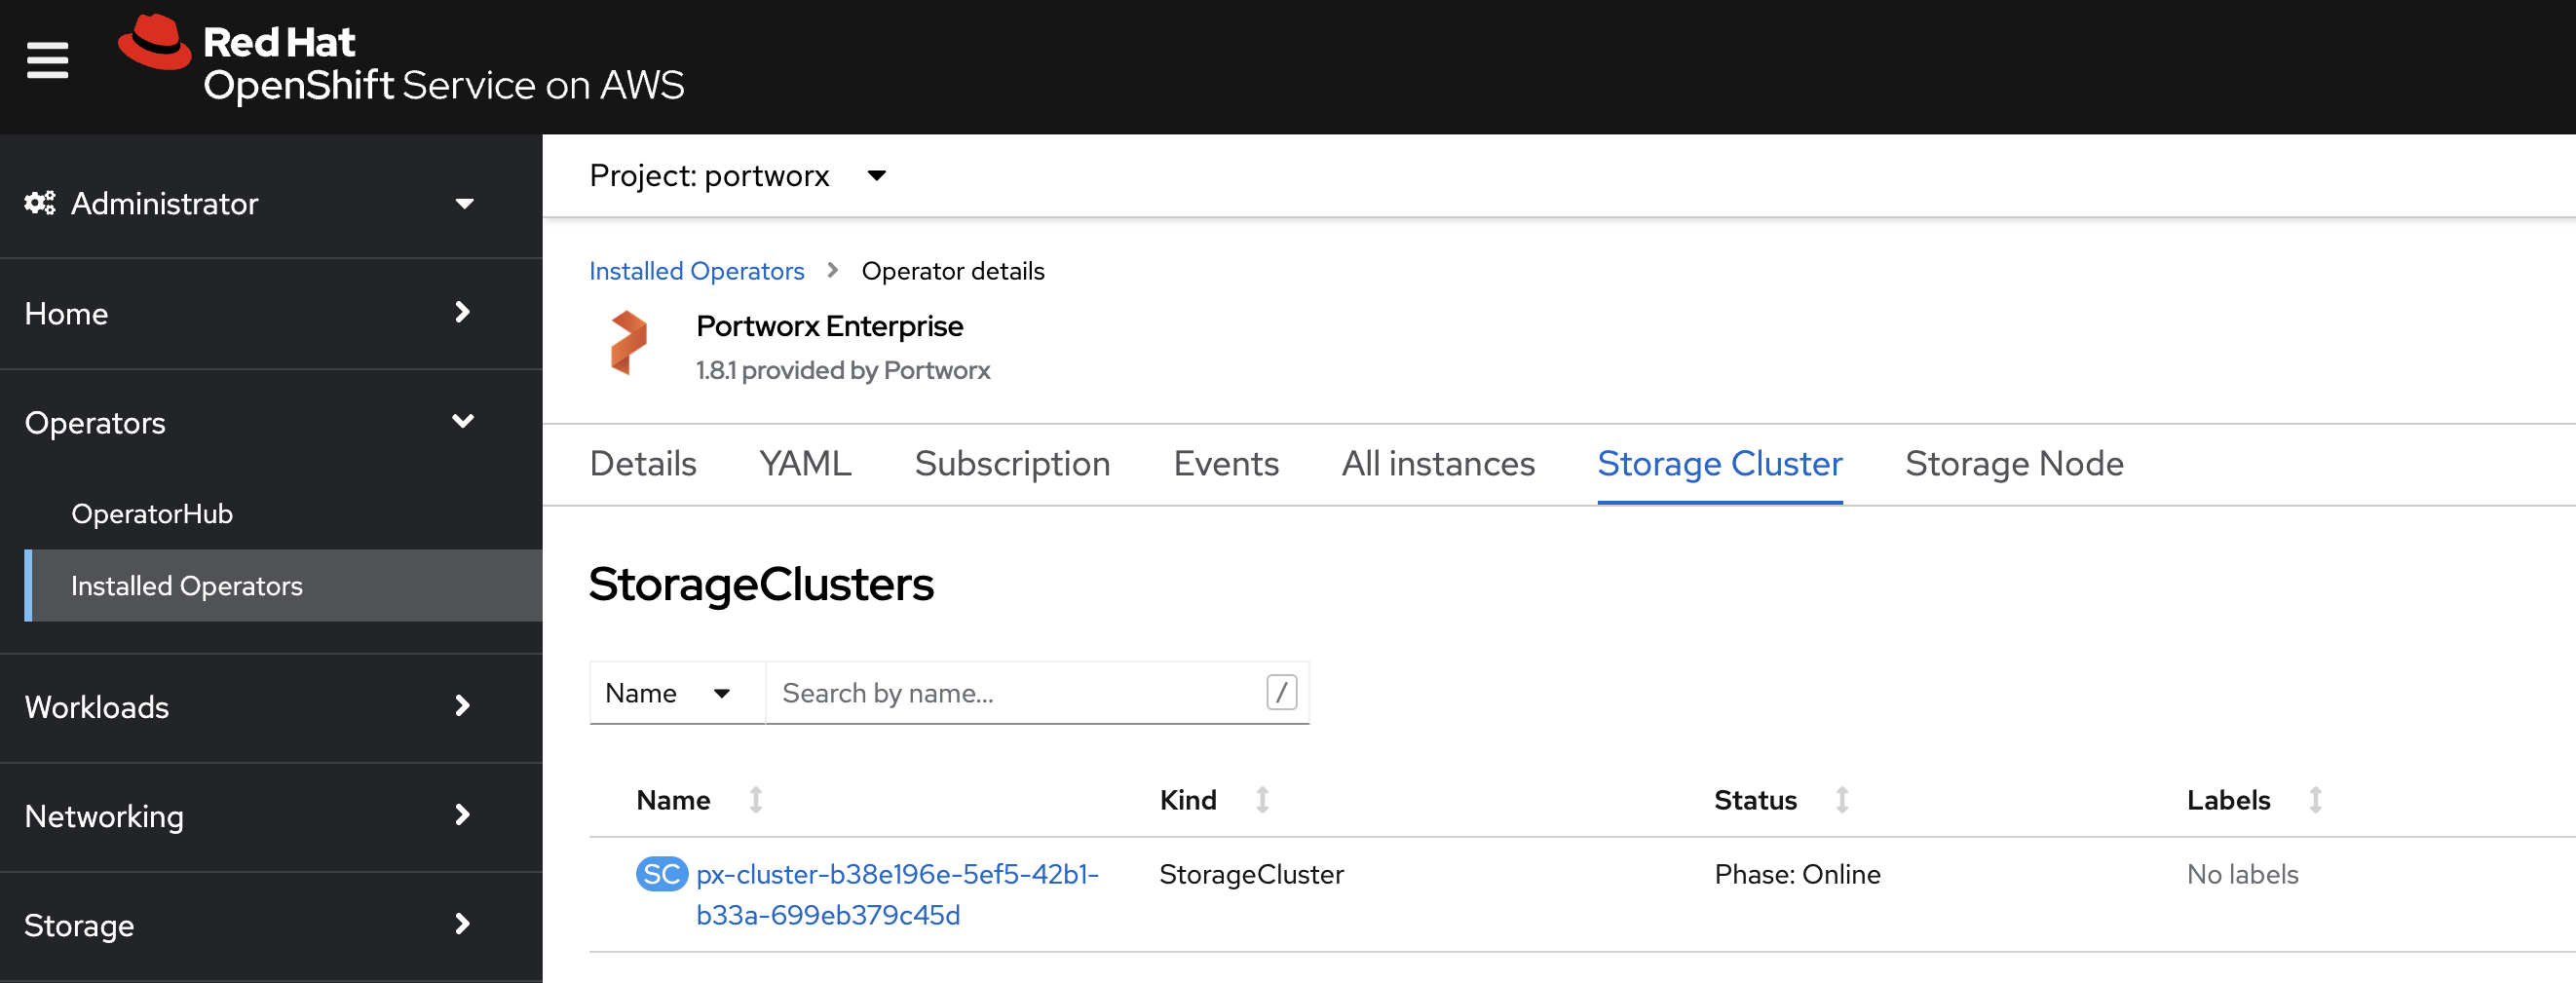
Verify that Portworx has deployed successfully by navigating to the Storage Cluster tab of the Installed Operators page:
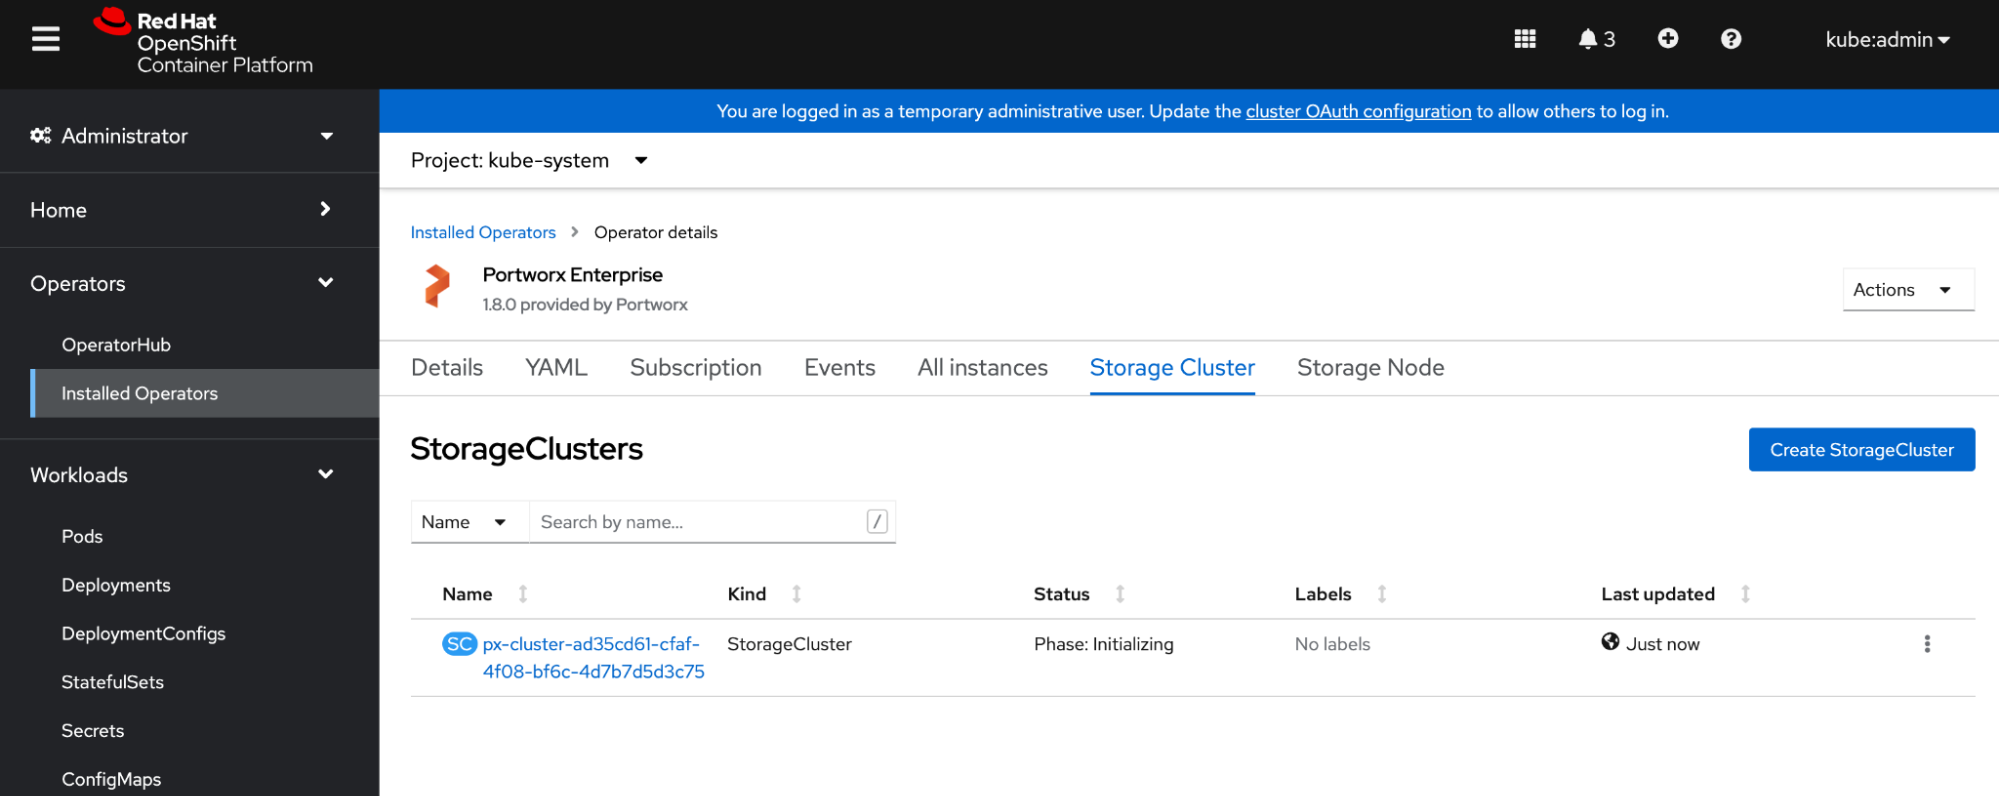
Once Portworx has fully deployed, the status will show as Online:
Refresh your browser to see the Portworx option in the left pane. Click the Cluster sub-tab to access the Portworx dashboard.
Verify your Portworx installation
Once you’ve installed Portworx, you can perform the following tasks to verify that Portworx has installed correctly.
Verify Portworx cluster status
Once you have created the StorageCluster, you can see the Portworx option in the left pane of the OpenShift UI. Click the Cluster sub-tab to view the Portworx dashboard.
If Portworx has been installed correctly, the status will be displayed as Running. You can also see the information about the status of Telemetry, Monitoring, and the version of Portworx and its components installed in your cluster.
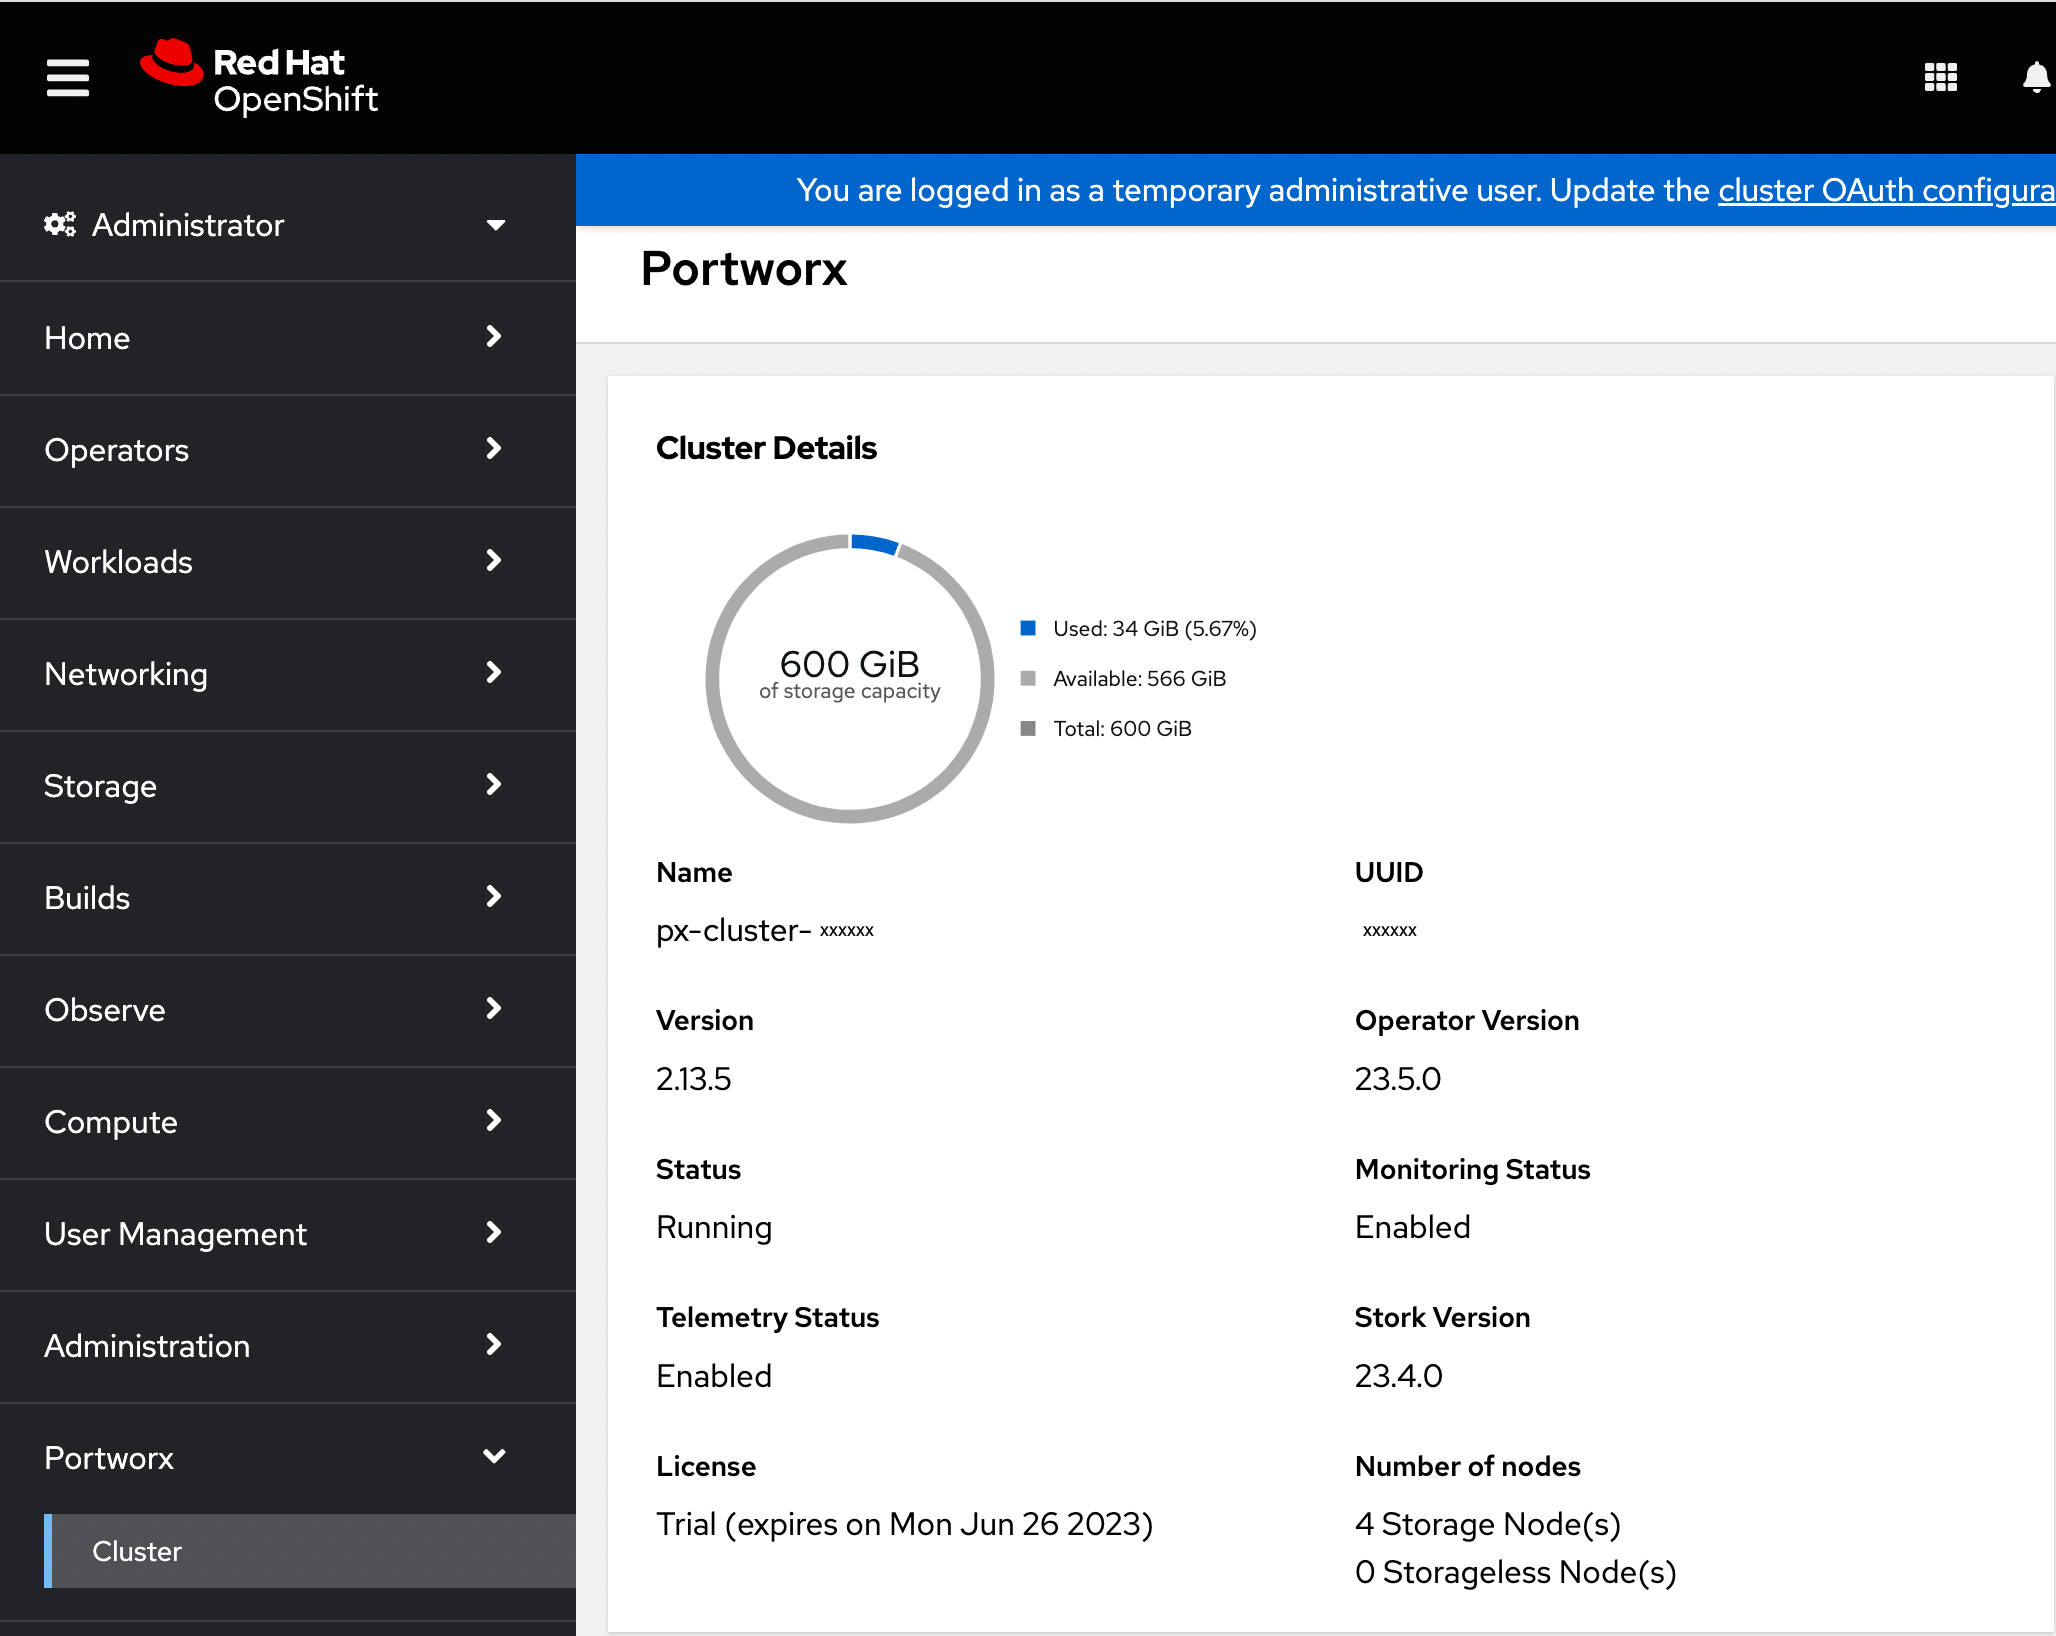
Navigate to the Node Summary section. If your cluster is running as intended, the status of all Portworx nodes should be Online.
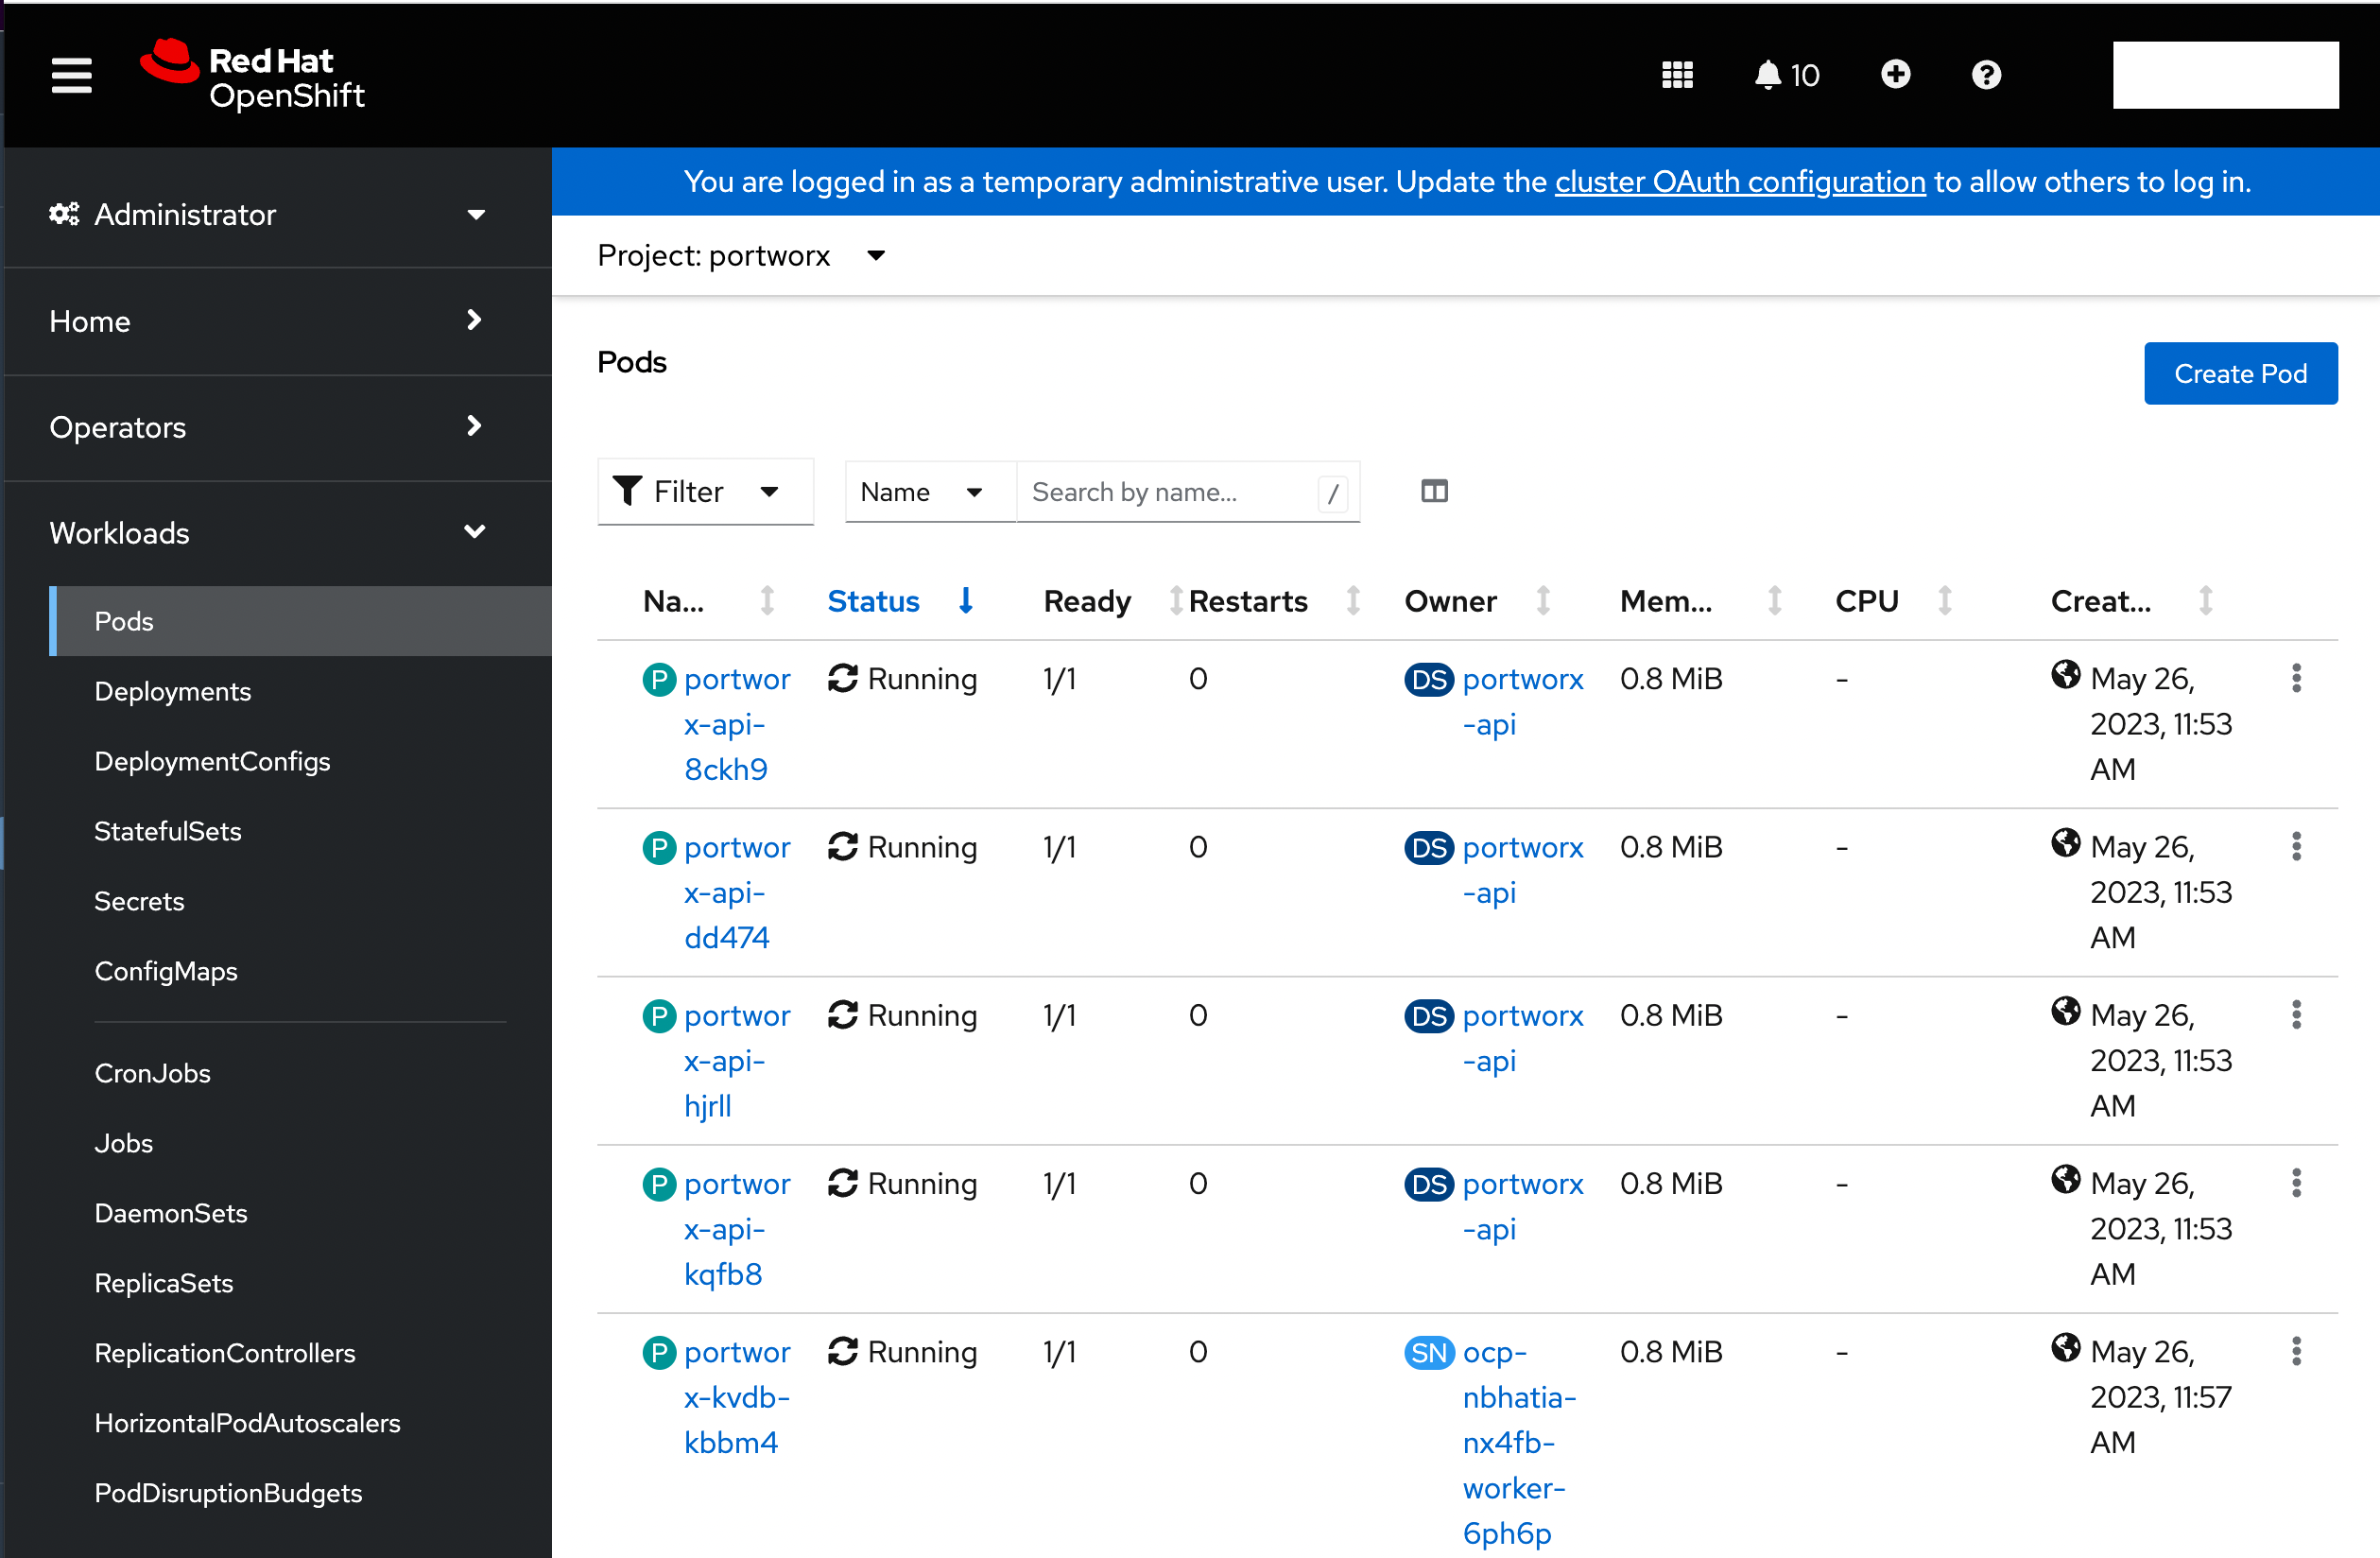
Verify if all pods are running
From the left pane of the OpenShift UI, click Pods under the Workload option. To check the status of all pods in the portworx namespace, select portworx from the Project drop-down. If Portworx is installed correctly, then all pods should be in the Running status:
Create your first PVC
For your apps to use persistent volumes powered by Portworx, you must use a StorageClass that references Portworx as the provisioner. Portworx includes a number of default StorageClasses, which you can reference with PersistentVolumeClaims (PVCs) you create. For a more general overview of how storage works within Kubernetes, refer to the Persistent Volumes section of the Kubernetes documentation.
Perform the following steps to create a PVC:
Paste the following in the text-editor to create a PVC referencing the
px-csi-dbdefault StorageClass and click Create:kind: PersistentVolumeClaim apiVersion: v1 metadata: name: px-check-pvc spec: storageClassName: px-csi-db accessModes: - ReadWriteOnce resources: requests: storage: 2GiRun the
oc applycommand to create a PVC:oc apply -f <your-pvc-name>.yamlpersistentvolumeclaim/example-pvc created
Verify your StorageClass and PVC
- Navigate to the Portworx dashboard by clicking Cluster under the Portworx option in the left pane.
Scroll to the Volumes section under Cluster details to view the status of your PVCs:

The
Upstatus indicates that the PVC is successfully bound to a Persistent Volume and is available for use.